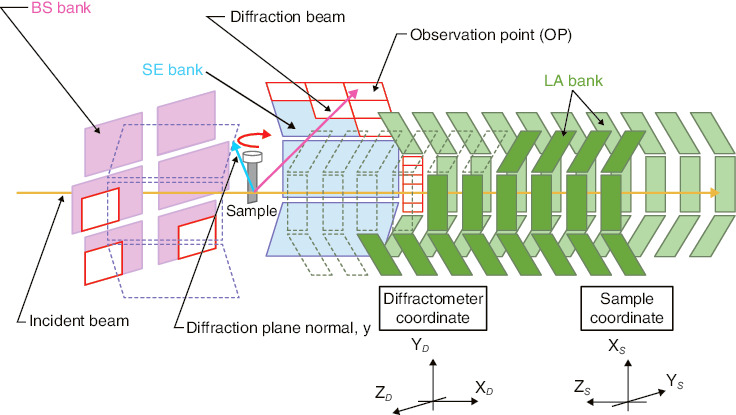
Fig.5-11 Schematic illustration of texture measurement at iMATERIA

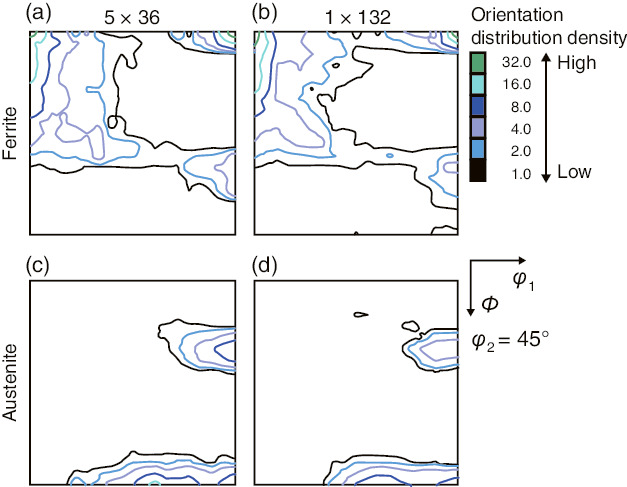
Fig.5-12 φ2 = 45° sections of orientation distribution functions (ODF (φ1, Φ, φ2)) of ferrite and austenite
Metallic material composed of fine crystal grains with various orientations usually possesses some specific orientation distribution deviating from the random distribution of a powder sample, due to the plastic deformation and/or heat treatment. The deviation extents and distribution densities (i.e., texture) have an evident influence upon the mechanical strength and plastic deformation of engineering materials. Therefore, precise and reliable texture measurement is essential for the development of high-value materials for many specific purposes, and rapid texture measurement instruments and related analytical techniques are required.
Conventional X-ray diffraction texture measurement only involves local information about materials near the surface within a depth of several tens of micrometers; the bulk textures related to macroscopic mechanical properties are not easy to obtain. Thanks to the high penetrability of neutrons, much more extensive bulk-texture measurements are becoming available through simple neutron experiments for reliable prediction of bulk mechanical properties.
During the angle-dispersive neutron diffraction texture measurement using a monochromatic neutron source, the diffracted neutrons towards numerous stereographic orientations are measured by a neutron detector with small angular coverage, such that at least several hundred sample rotations are necessary over a long period to collect enough information for texture calculation.
During time-of-flight neutron diffraction, the polychromatic neutrons can be recorded sensitively according to different wavelengths through monitoring their arrival times from the neutron source through the sample to various neutron observation points, such that the corresponding time-of-flight neutron diffraction pattern can be obtained. For the IBARAKI Materials Design Diffractometer (iMATERIA, Fig.5-11) at the Japan Proton Accelerator Research Complex (J-PARC), there are 132 observation points for collecting neutron-diffraction patterns independently. Through simultaneous Rietveld texture analysis of 132 diffraction patterns with the Materials Analysis Using Diffraction (MAUD) software, both the bulk averaged texture and the phase volume fractions of materials can be determined by a simple irradiation without any sample rotation. For the austenite-ferrite duplex stainless steel sheet, it is difficult to determine the precise phase fraction using X-ray diffraction because of strong texture. At iMATERIA, 10 minutes is sufficient for simple radiation of the above steel sample, and its phase fraction and bulk textures were determined simultaneously; this represents the rapidest measurement level ever achieved in the world (Fig.5-12).
Considering that the neutron beam flux at J-PARC is increasing, the measurement time for bulk textures per sample may decline to less than 1 minute in the near future. Therefore, iMATERIA has become a powerful neutron diffractometer for frontier materials R&D activities. For example, its rapid texture measurement is expected to enable it to monitor real-time change in bulk textures and phase volume fractions during rapid plastic deformation and/or rapid heating of engineering materials. This technology is also expected to be useful in texture-optimization researches of advanced electromagnetic steel sheets for high performance electric motors, and next-generation ultrahigh strength multiphase steel sheets for automobile body lightening.
This research was accomplished as a collaborative study among Ibaraki University, Ibaraki Prefectural Government, Japan Atomic Energy Agency and Nippon Yakin Kogyo Co., Ltd.